You Bought a Gel Nail Kit to Use at Home: 7 Mistakes That Wreck Your Nails Without You Noticing
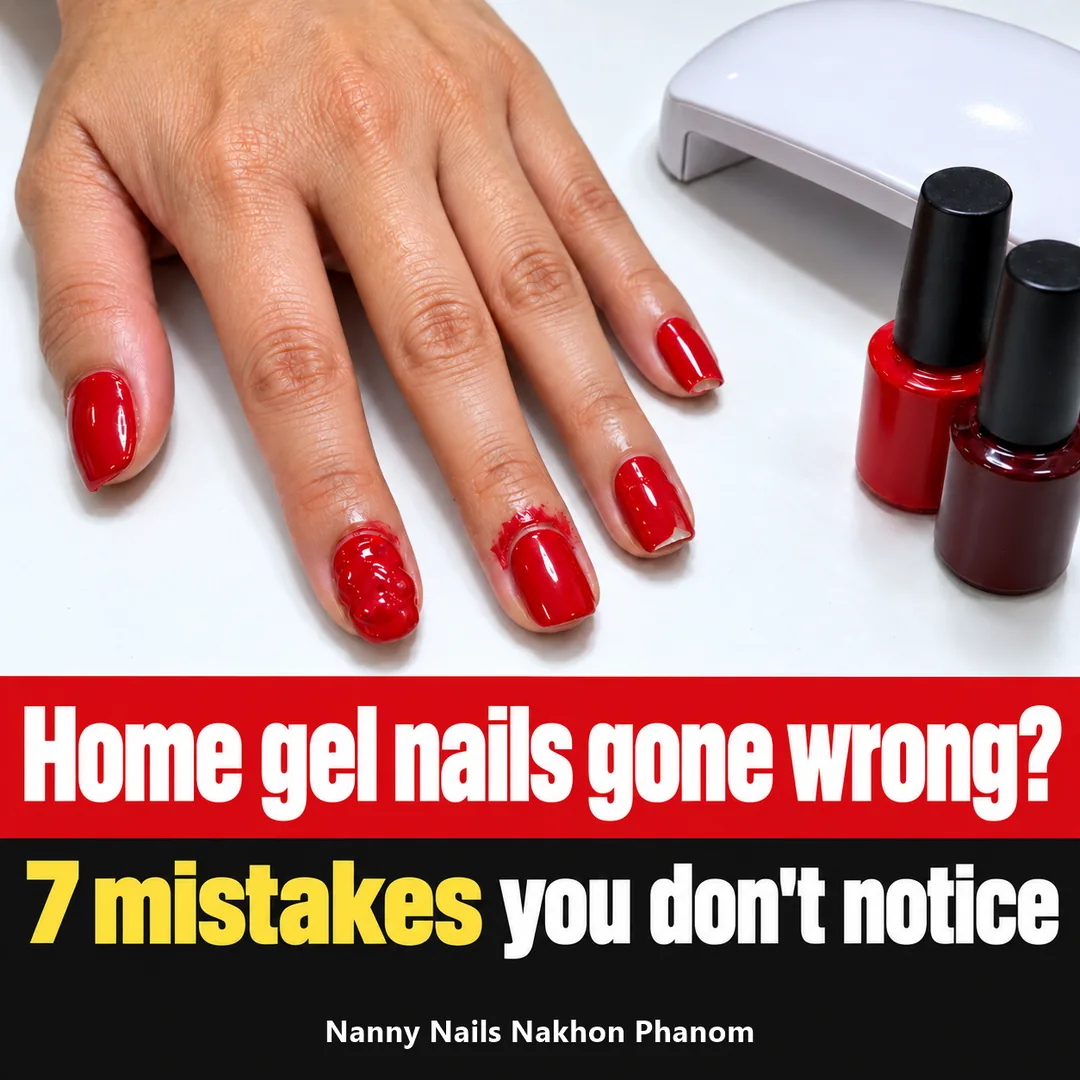
You bought a gel nail kit with good intentions, watched a tutorial, painted one nail at a time and cured them the way you saw it done. Then the result was not what you expected. Some nails have gel that wrinkles into ridges, the edges are smeared onto your skin, or by day three the tips start to lift. The sad part is that most of this is not about clumsy hands. It comes from small points that kits and videos rarely mention. This article lists 7 mistakes people make with gel nails at home without noticing, so you can check your own routine one by one, and then compares doing it yourself with letting a salon do it so you can pick the way that suits you.
Let us be clear first: this article does not tell you to stop doing it yourself. Gel nails at home can work, and plenty of people get tidy results. But gel is more different from regular polish than most people buying a kit realise. Regular polish dries on its own in the air. Gel needs light from a lamp to harden. The UV light from the lamp is what makes the gel bond to the nail. If the light does not reach all the gel, or the gel is too thick, problems follow one after another.
Where DIY gel nails go wrong: the overview
Home gel problems come in only a few shapes. See which ones your hands have met: a thick lump of gel with a wrinkled surface, gel smeared onto the skin around the nail, gel lifting at the base, a tip that was never sealed, and gel that peels off in a sheet after it is picked away. The picture below puts all five on one hand.
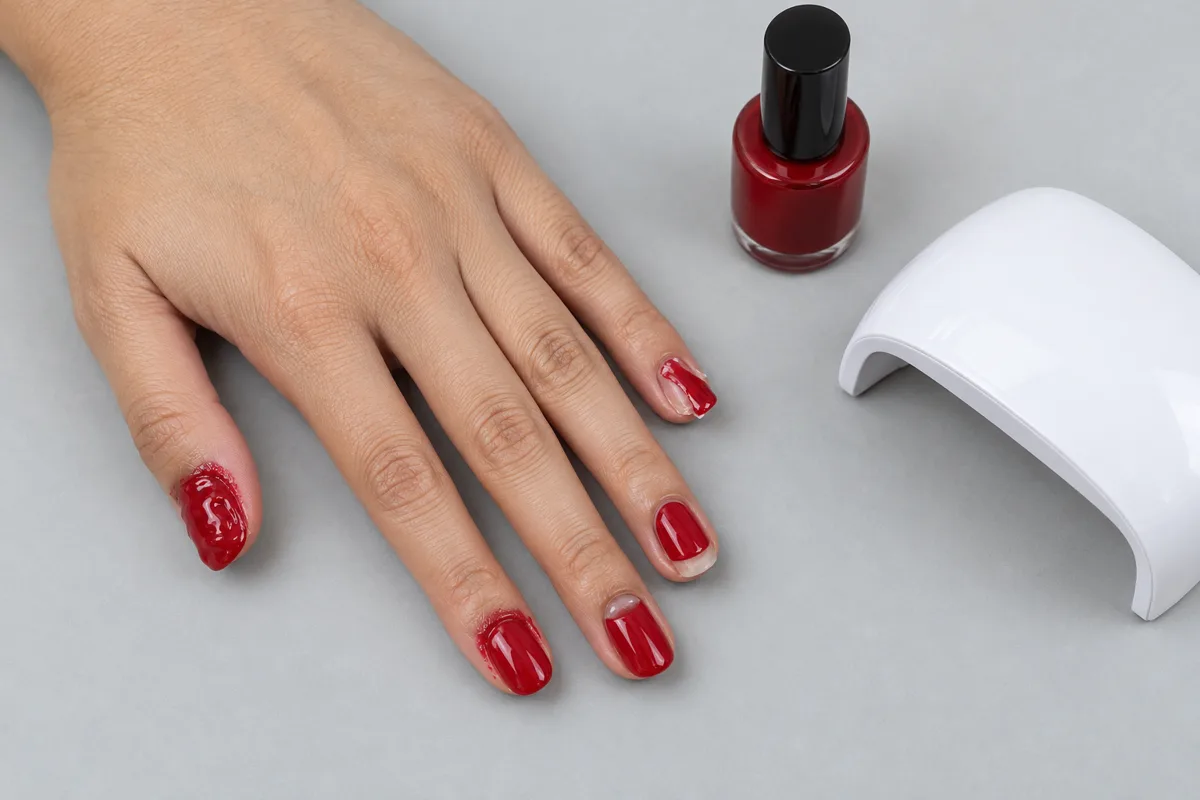
All five come from the 7 points below, in the order you meet them while doing the job, from choosing the lamp to taking the gel off.
Mistake 1: the gel and the lamp do not come from the same kit
Some gel kits come with a lamp, but many people buy a bottle of gel and use a lamp they already own, or buy one separately because it is cheaper. That sounds harmless, but each brand of gel is made to harden under a certain kind of light. If the lamp does not match, the gel may not harden fully.
We always tell customers to use the lamp the manufacturer recommends, because the wrong lamp may stop the gel from curing properly, and gel that is not fully cured raises the chance of an allergy. Besides allergy, our owner says gel that was not cured dry is one cause of gel that lifts off the whole nail.
Before your first use, read the gel label for the kind of lamp it needs, then use the lamp that comes with the kit or that the maker names. Our salon uses a UV lamp. For how safe the light from a lamp is, we cover it in detail in Is a UV nail lamp dangerous?
Mistake 2: curing for less time than the bottle says, and one thick coat to be done faster
This is the most common slip, because it looks like saving time. One thick coat cured once seems quicker than two thin ones. But the light has to travel through the gel to the bottom. The thicker the layer, the less light reaches the lower part. The top may be hard while the inside is still soft, and once you press on it or use your hands for a day, the surface wrinkles or slides off the nail.
The curing time depends on each brand's gel and lamp, so follow the number on your bottle or in your kit's manual, not a number from a video that uses another brand. The rule that fits almost every kit is to apply thin coats and cure every coat for the full time. Two or three thin coats beat one thick one.
- A rippled or wrinkled surface is often a sign that the coat was too thick
- Gel that stays soft and dents under a fingertip after curing means the inside has not hardened
- Gel that lifts as a whole sheet within a few days is another sign nail techs often connect with gel that was not fully cured
The salon owner says gel that lifts off the whole nail usually has three causes: a very thin nail with nothing for the colour to hold on to, gel that is not cured dry, and the quality of the colour. Two of the three are about curing.
Mistake 3: gel on the skin or cuticle, then cured anyway
Everyone who does gel at home has painted past the edge. The brush slips onto the skin, and you think you will cure it and pick it off later. That causes two problems at once. First, gel stuck to skin moves when the skin moves and pulls the gel on the nail up with it. The owner says gel that lifts at the base usually comes from the nail not being cleared well and from colour painted up onto the skin.
Second, and more important, is allergy. Allergy to the acrylates in gel can start when uncured gel touches any part of the skin, so be especially careful with gel kits used at home. Reactions can show on the fingertips or elsewhere, such as the eyelids, face and neck. If you get itching, swelling or a rash after doing your nails, stop using the product and see a doctor rather than guessing.
Reducing the risk is simple. Leave a thin gap between the gel and the skin all around the nail, wipe off any gel that lands on skin before you cure, and never leave uncured gel on your skin.
Mistake 4: skipping nail prep and skipping the base coat
Many gel tutorials cut the prep to keep the video short, even though it decides how long the colour lasts. Gel grips a clean, non-shiny nail surface. If there is oil, cream, filing dust or shine on the nail, the gel will not hold firmly. Oil on the nail makes polish come off, and that applies to gel as much as regular polish.
The base coat is the layer applied before every colour. Its job is to hold the colour to the nail and to keep dark colours from marking the nail surface. At our salon the base goes on every single job. Shaping, base and top coat are included in the price of every service. For clearing the nail, the tech pushes back the cuticle first, then trims the excess skin, because the owner says poor clearing is one cause of gel lifting at the base.
If you are coming to the salon, you do not need to put hand cream or oil on beforehand, because oil makes the colour grip less well. You also do not need to cut or file your nails first. We shape them on every job, and nails cut too short are hard to shape.
Mistake 5: not sealing the tip of the nail
The tip takes the most knocks. Typing, opening a can, opening a bag, all of it uses the tip of the nail. If the gel stops before the edge and leaves a strip of bare nail, water and dirt can get under the edge of the gel more easily, and an unsealed edge is the first part to lift. The owner says gel that lifts at the tip is usually caused by a tip that was not sealed well, or nails so short that the tip is hard to seal.
What home users can do: with every coat, base, colour and top, run the brush lightly along the edge of the tip, so the gel wraps over the free edge, and cure every coat. Do not let gel pool into a thick bead at the tip, or you are back at mistake 2.
Mistake 6: picking or scraping off gel that has lifted
This one hurts nails the most and almost everyone has done it. You see the edge of the gel lift a little, you pick at it, and it seems fine at the time. But the part that is still well stuck pulls a layer of real nail surface away with it. Repeat it a few times and the nail gets thinner each round. Gel manicures can make nails brittle, peeling and cracked, and our rule is simple: do not pick at the polish or use other nails or tools to remove it. If gel starts to lift, have a nail tech take it off.
If you really do want to take it off at home, use acetone, soaking only the fingertips, wrapped in foil for about 15 minutes, after which the gel should come off by itself without hard scraping. Step by step is in Can you remove gel nails at home? At our salon we use a nail drill and then an acetone wrap, which is a tech's method that needs the tools and the skill, not something we suggest you do yourself.
On how often, we suggest letting nails rest from polish for one to two weeks or longer every so often, and putting petroleum jelly on the nails and the skin around them several times a day.
Mistake 7: unclean tools, and gel over a nail that has a problem
A gel kit comes with a file, a pusher and brushes, used again every round and sometimes shared with a friend or someone at home. Tools that are not washed and wiped clean carry dirt back to the nail every time. Washing and wiping your tools before each use, and not sharing them, is something you can do right away with no extra knowledge.
The other point is painting gel over a nail that already has a problem, such as thick yellow nails, a nail that is changing colour, or a nail starting to separate from the nail bed, because you want it to look good fast. Artificial nails and gel should not be used to cover up nail problems because they may make the problems worse, and nail problems are for a doctor to look at. Our salon does not paint over thick yellow nails or nails we suspect are fungal either, because the nail service adds moisture to the nail and the infection may spread. If your nail looks like this, read more in Fungal nails or just yellow nails?
Doing it yourself or letting the salon do it: how they differ
If you have read this far and see yourself in several of these, do not feel bad. Doing it yourself is not wrong. The table compares the two ways so you can see what each one asks of you, and you can choose what is convenient for you.
| Topic | At home | At the salon |
|---|---|---|
| Lamp and gel | You match the gel to the lamp and read the labels yourself | The salon uses a UV lamp and has over 536 gel shades to choose from |
| Nail prep | You keep the order in your head, and skipping a step weakens the grip | Shaping, clearing the nail, base and top coat are included in every job |
| Cost | You pay for the kit once, the price depends on the brand, and a new colour means buying more gel | Gel polish on the hands, 1 colour, 200 baht, designs or techniques extra, as on the menu |
| Taking it off | You soak in acetone and wait it out yourself | The salon removes it. Removal before a new set is 5 baht a nail, 50 baht for both hands |
| If something goes wrong | You find the cause and fix it yourself | Salon work comes with a 7-day care period and a tech to look at it |
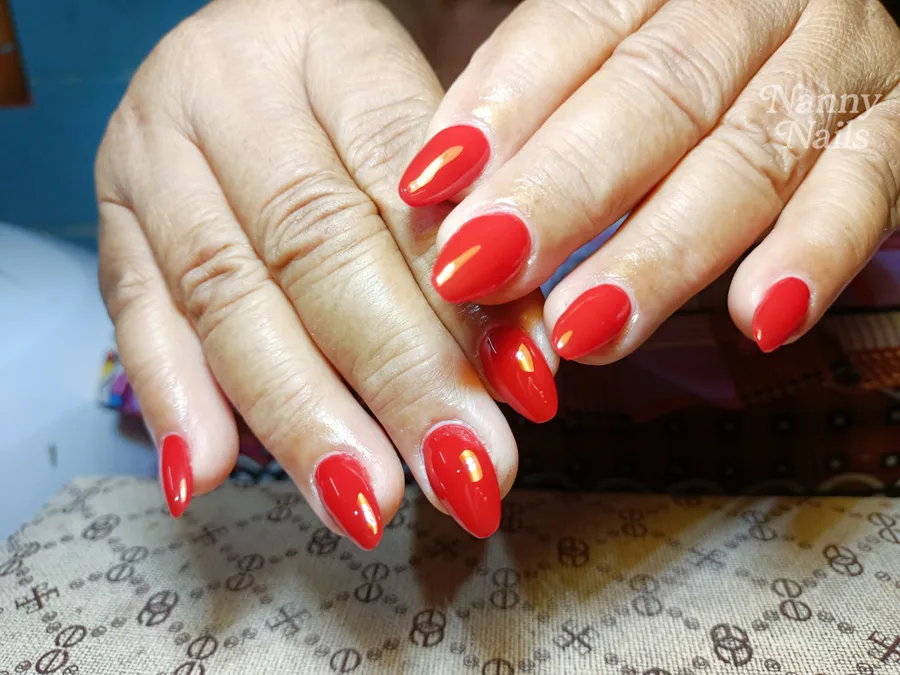
The photo above is plain red gel done at the salon. Look at the base of the nail and the sides: the colour stops a thin line away from the skin and does not climb up onto it, which is what mistakes 3 and 4 are about.
If you want to keep doing it yourself, how to slip up less
If you enjoy doing it yourself and want to carry on, check these five things before the next round.
- Use a lamp that matches the gel. Read the label for the kind of lamp it needs
- Prep the nail so it is clean and not shiny, and put on the base every time. No cream or oil beforehand
- Thin coats, each cured for the full time on the bottle. Do not rush it into one coat
- Keep the gel off the skin, wipe off any gel on the skin before curing, and seal the tip in every coat
- Do not pick or scrape lifting gel. Take it off with acetone the right way, or let a tech do it, and rest your nails now and then
If you want the salon to take off the old gel and redo it
If you have gel you did yourself on your nails and want the salon to do the next set, do not pick it off or remove it yourself first. We remove it for you so your nails do not get thinner. The salon does not do gel fills: every round the old set comes off and a new set goes on. You can also send a photo of the design you want on LINE before your appointment, and the tech prepares the colours ahead of time and tells you the price. If you have ever had an allergy to gel, please tell us. We do not take customers who have had a gel or gel colour allergy, and we ask them to see a doctor first.
What customers say
We have 144 reviews on Google with a rating of 5.0, and we take 3 bookings a day. What customers keep coming back to mention is colour that lasts.
All work at the salon comes with a 7-day care period. To learn how long gel nails last in general, and what makes them lift early, read Why gel nails lift: where it lifts tells you the cause, or pick a colour first in the gallery.
FAQ
Can I do gel nails at home, and is it safe?
You can, but you need to cure the gel all the way through and keep uncured gel off your skin. Gel kits used at home need extra care, because uncured gel on the skin is a cause of allergy to acrylates. Read the whole kit manual and use the lamp the manufacturer recommends. If you get itching, swelling or a rash after doing your nails, stop using the product and see a doctor.
How do I use a nail lamp, and for how many minutes?
Curing time depends on each brand of gel and lamp, so follow the number on the bottle or in the manual of the kit you bought, not a number from a video that uses a different brand. Apply thin coats and cure every coat for the full time. Do not do one thick coat, and use a lamp that matches the gel. Nanny Nails uses a UV lamp.
What should I do if gel gets on the skin around the nail?
Stop and wipe the gel off the skin before curing, and do not leave uncured gel on your skin, because direct skin contact can cause allergy. If you get itching, swelling or a rash, see a doctor. A nail salon is not a clinic and cannot diagnose an allergy.
My home gel has lifted. Can I pick it off?
We do not recommend it. Do not pick at it or use other nails or tools to remove it, because that thins and peels the nail. Take it off with acetone, wrapped in foil for about 15 minutes, done the right way, or let a tech remove it. At the salon, removal before a new set is 5 baht a nail.
Will the salon take off gel I did myself and redo it?
Yes. You do not need to pick it off first. We remove it with a nail drill and an acetone wrap, and removal before a new set is 5 baht a nail. We do not do gel fills: every round the old set comes off and a new one goes on. If the nail is thick and yellow or we suspect fungus, we do not paint over it, so please see a doctor first. We also do not take customers who have had a gel allergy.
What is the salon’s 7-day care period?
If work done at the salon lifts or peels within 7 days, bring it back and we will fix it for free.
How do I book, and what if I am late?
Book on LINE @nannynails or call +66 99 002 8935. We take 3 bookings a day, 09:00 to 18:00. The deposit is 100 baht per booking. Tell us 1 hour ahead to move your booking and keep the deposit once. If you are more than 20 minutes late, we reserve the right to cancel the booking and keep the deposit.
Keep doing it yourself, or let the salon do it: either way works
If you would like the salon to do it, send a photo of a design you like to LINE @nannynails. We prepare the colours before your appointment and tell you the price. If you still have old gel on your nails, send a photo of your hands and we take it off for you, so you do not have to pick it. If you would rather keep doing it yourself, run through the five checks above before your next round. We take 3 bookings a day, 09:00 to 18:00.
Read more